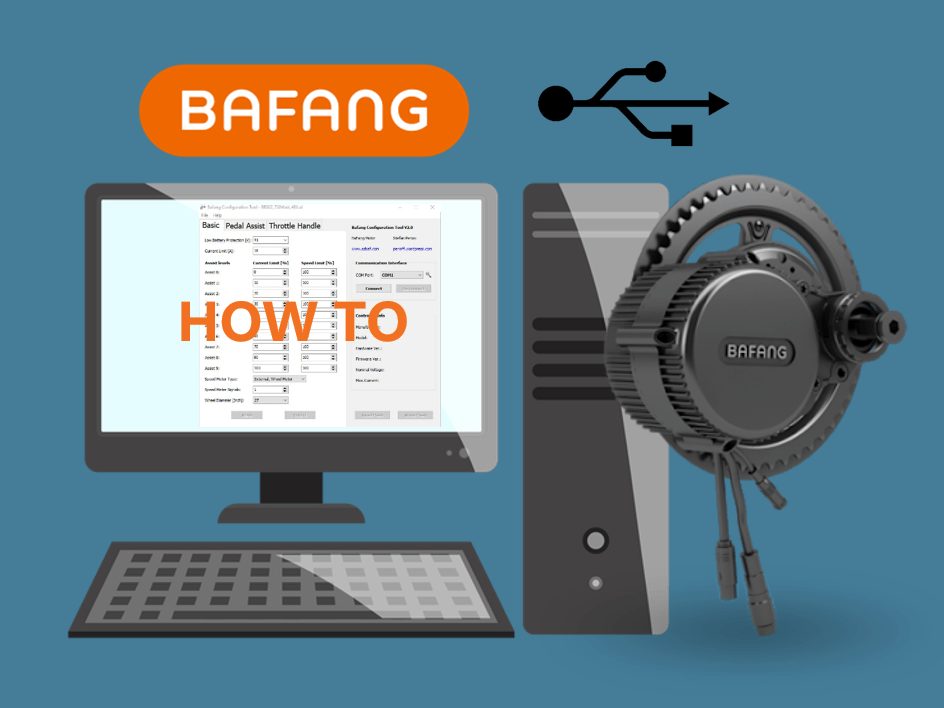
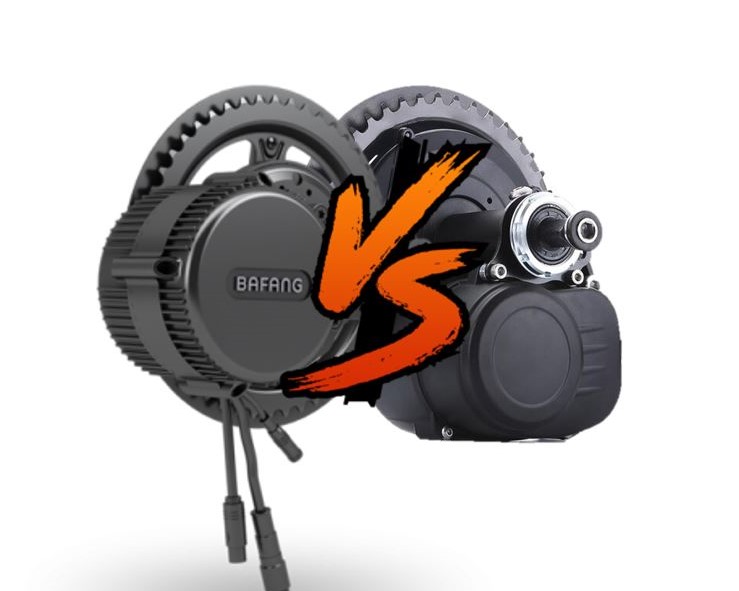
Reprogramming your Bafang mid-drive system can improve the usability and performance of your ebike. The stock settings out of the factory are often not the best settings. You will find that for example, the first pedal-assist setting is way too powerful, or that the speed limits are just annoying. With the help of this guide, you can reprogram your system to better settings with my custom .el file. You can also learn about all the settings and reprogram the system to your likings.
Disclaimer: Reprogramming your Bafang system is not without risk. If you change the wrong settings and you don’t exactly know what you are doing, damage can be done to the controller. You can even destroy the controller in certain cases. So only customize your own settings if you understand what they mean and what the risks are. I am not responsible for any damage that might occur.
Necessary hardware and software
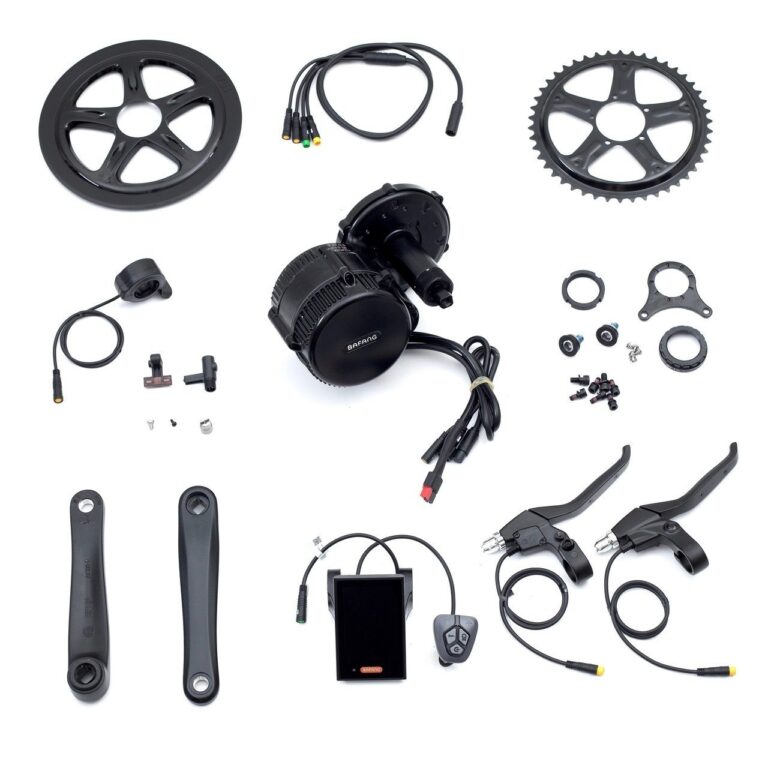
In order to start reprogramming your Bafang BBSxx mid-drive system, you will need a programming cable. You can purchase this cable with this order link:
You will also need to install a driver and the Bafang configuration tool:
Bafang configuration tool:
https://drive.google.com/file/d/1B7ge8RMrSAE3w591K3MOjZR7XVAKc0gi/view?usp=sharing
USB Drivers:
Windows 10 USB Driver:
https://drive.google.com/file/d/1rerH9mTJQfyJcuiB5atlN_aV99v8UBij/view
Windows 7/8/8.1 USB Driver:
https://drive.google.com/file/d/14JJ_HZJB2nisMVprWC7R7N3box2lAaTv/view
Windows XP/Server 2003/Vista USB Driver:
https://drive.google.com/file/d/1ylMb70vfWctFonILpQsWwjPzrEH6gmJ-/view
If you have trouble opening the .rar files, download WinRAR:
https://winrar.nl.softonic.com/
NOTE: Not all cables necessarily use the CP210x driver. Some cables may require the CH341, or another driver.
Bafang configuration tool instructions
If you have purchased the cable, installed the driver, and installed the configuration tool you are ready to go. Now follow the following steps in order:
- Unplug the battery of your e-bike
- Unplug the Display cable
- Connect the programming cable to the display cable
- Plug in the battery of your e-bike (and turn it on)
- Plug in the USB cable of the programming cable to your desktop/notebook
You are now ready to start using the configuration tool. If you don’t want to know about all the settings, but just want a better configuration, you can use my configuration. First, you need to download the right configuration for your model. Download the correct file according to your Bafang motor version. If you have another Bafang version you cannot use these files. You will have to follow the rest of the post and change the settings yourself.
Bafang BBS02 500 Watt 36V:
https://drive.google.com/file/d/1pezpHsR6sLzx_kXPQ1v9luHHsueX6jyB/view?usp=sharing
Bafang BBS02 750 Watt 48V:
https://drive.google.com/open?id=1sxLa99ycpnrktxezmi-BswAjgvsrm_LC
Bafang BBSHD 1000 Watt 48V:
https://drive.google.com/open?id=1zS03gj-v-EZNjiRqACd0LOi5ydOOsyIN
To use these configurations you need to follow the following steps:
You first need to back up your default settings. If something goes wrong you can always return to the default settings. You do this as follows:
- Select the COM port that your USB programming cable is connected to. Hitting the magnifying glass will automatically select the correct port.
- Now click ”Connect”
- Now click “Read flash” in the right bottom corner of the program.
- You should now see all your settings.
- Click ”File” in the left top corner of the program.
- Click ”save as” and save your file at a location that you can access later if necessary.
- You now have created a back-up you can use later if problems occur.
Instructions to insert my custom configuration
- Select the COM port that your USB programming cable is connected to. Hitting the magnifying glass will automatically select the correct port.
- Now click ”Connect”
- Now click “Read flash” in the right bottom corner of the program.
- You should now see all your settings.
- Now click ”File” in the left top corner of the program.
- Click ”load” and select the file you downloaded, make sure that you downloaded the right version for your motor (BBS02 750 Watt or BBSHD 1000 Watt).
- Only change the setting ”Wheel Diameter[inch]” to your wheel diameter, leave the other settings unchanged.
- Now click ”Write flash” in the right bottom corner of the program.
- You now have successfully reprogrammed your Bafang system with custom settings.
- Close the program, unplug the battery, unplug the programming cable, plug in the display cable and connect the battery again.
- You are now ready to test your new configuration.
If you don’t like these settings and you want to tweak certain settings, you can read the rest of this post and adjust certain settings.
Explanation of all the settings/my recommended settings
All these settings that are recommended here are the same as in the configuration files above. So if you want these settings, follow the steps above.
Settings in the first tab (Basic)
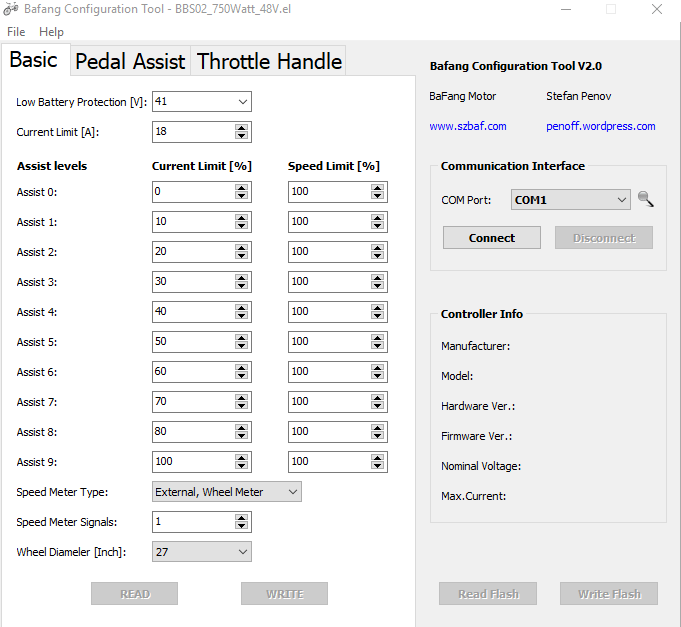
Low Battery Protection [V]: 41
This setting will prevent damage to your battery. If your battery voltage drops lower than the number assigned in this setting, the motor will stop working. This way the battery can’t be discharged further. If you have a 48V battery, I don’t recommend lowering this value since it can cause serious damage to your battery. If you have a 52V battery, you need to set this value to 44.
Current Limit [A]: 18 for BBS02 750 Watt, 30 for BBSHD 1000 Watt
This setting will set the maximum current that the controller will draw. In theory, the BBS02 750 Watt version can handle 25A, because it has a 25A controller. I, however, do not recommend setting this to 25. The MOSFETs and the cooling systems of the BBS02 are not really designed for 25A and therefore will reduce the life expectancy of your motor. 18A still gives great performance with plenty of power for most people. If you want insane power, get the BBSHD, this motor has a 30A controller. The controller and cooling of the BBSHD are better than the BBS02. That’s why the setting should/can be set to 30 if you have the BBSHD.
Assist levels:
Now the settings for the assist levels. I recommend setting all the ”Speed Limit [%]” to 100%, this way the motor will only stop assisting when you hit the max speed that you set on your display. I found it really annoying that the motor would stop assisting at different speeds, at different assist levels. The better way of doing it is just to change the power level for the different assist levels. The max speed you will hit in that assist level will then be dependent on the amount of power. This way the bike will just keep assisting with a specified amount of power for that assist level. I also recommend increasing the ”Current Limit [%]” 10% at a time. This way you have amazing control over the amount of power. The ”Current Limit [%]” setting specifies the percentage of the ”current limit[A]” the motor can use at that level. So if the ”Current Limit [%]” is set to 50 in assist level 5, it will use (0,5 * 18 = 9A) max in assist level 5. I recommend the following settings:
Assist Level/Current Limit [%]/Speed Limit [%]:
0/0/100
1/10/100
2/20/100
3/30/100
4/40/100
5/50/100
6/60/100
7/70/100
8/80/100
9/100/100
Speed Meter Type: External, Wheel Meter
This is the only speed sensor that works with the Bafang BBSxx, this setting is the default. So don’t change it to something different.
Speed Meter Signal: 1
The only setting that works is 1, again default. Don’t change it to anything different.
Wheel Diameter [Inch]: custom
Set this setting to your wheel diameter, if your wheel diameter isn’t in the list, then select the one that is closest to your wheel diameter.
Settings in the second tab (Pedal Assist)
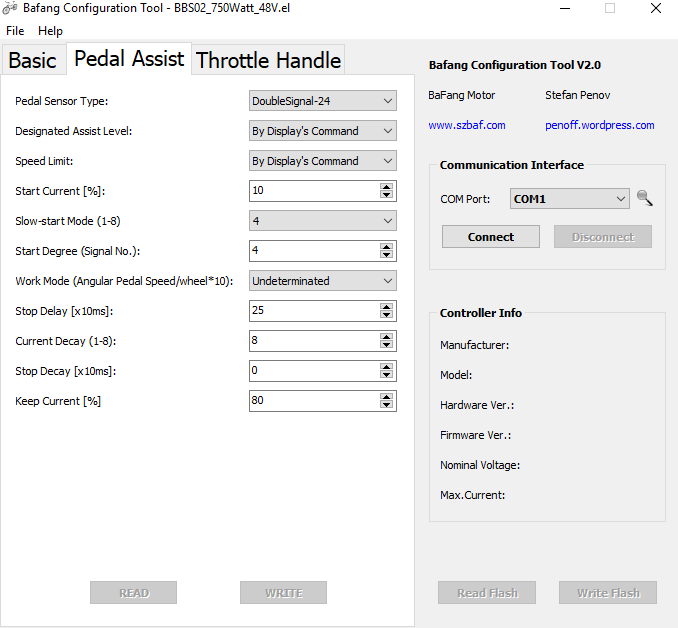
Pedal Sensor Type: DoubleSignal-24
This is the only setting that works correctly, again the default setting, don’t change.
Designated Assist Level: By Display’s Command
In order to change the number of assist levels with your display set this to ”By Display’s Command”. This is the only setting that makes sense because it’s convenient to be able to change this in the display settings.
Speed Limit: By Display’s Command
In order to change the speed limit with the help of the display you have to set this to ”By Display’s Command”. If you want the e-bike to be limited to a certain speed that can’t be changed on the display, you have to assign a certain speed to this setting. If you want the e-bike to limited to 25km/u, select 25km/u. You then can’t change the speed limit on the display of the e-bike. So this setting can be handy for legal reasons.
Start Current[%]: 10
This setting will decide how much current the motor will draw on startup. It, in turn, will decide how fast the e-bike will accelerate. I recommend 10, because then your drive train won’t be under a lot of strain as you accelerate. If you want higher acceleration you can set this value to 20 or 30. I don’t recommend setting this higher than 20 or 30, then most drivetrains will have a hard time and you can potentially break your controller if you are in too high of a gear.
Slow-start Mode(1-8): 4
This setting will decide how fast the current will increase when accelerating. I recommend 4, because this is a nice sweet spot. If you increase slow start, your start will be really slow and jerky. If you decrease slow start, you will accelerate faster. But you also risk damaging or breaking your controller. So I recommend just leaving it to 4.
Start Degree (Signal No.): 4
This setting will decide after what number of steps the motor will start assisting. I recommend 4 because this results in a responsive system. It also is not too responsive, which is good. If you want the pedal-assist to start the fastest when you just pedal a small bit, change it to 2. Changing it to 0 or 1 won’t work, so don’t do that. The maximum will be 20 (24 is a full rotation). But I don’t recommend setting it higher than 4.
Work Mode (Angular Pedal Speed/wheel*10): Undeterminated
Changing this setting doesn’t do anything noticeable. So leave it to default which is undeterminated.
Stop Delay [x10ms]: 25
This setting will decide how fast the motor will stop assisting when you stop pedaling. If you have e-brakes installed I recommend 25, because it is nice that it won’t stop immediately. And if you want the motor to stop straight away, you just hit the brakes. If you don’t have e-brakes however, set this to 10. 10 is the lowest value that will work properly. If you decrease it even more, the pedal-assist won’t work at all anymore for some reason.
Current Decay (1-8): 8
The lower this setting, the faster the drive unit will decrease power as you pedal faster. You don’t want the power to cut down a lot if you pedal faster, so leave this to 8. This also is the default setting.
Stop Decay [x10ms]: 0
This setting determines the amount of time the system takes to reduce the power when you stop pedaling. I think it’s best that the power goes to 0 when you stop pedaling instantly. This is what you would expect. 0 is again default, so I don’t see a reason to change this.
Keep Current[%]: 80
This is a sneaky but important setting. Keep current will decide to which current your motor will drop. It only does this when you are pedaling at a high rate (so if you have reached a constant speed). Then it will drop to for example 80 percent of the current that is assigned in the selected assist level. So if you set this setting really low, then the motor will assist less when you have reached a constant speed. If you set this setting higher, it will assist more when you have reached a constant speed. I recommend 80% because this gives plenty of power when a constant speed is reached. It nicely compensates for your pedaling power. If you want to pedal more yourself and save more battery at a constant speed, set it to 60%. Anything other than 60 or 80 is not recommended.
Settings in the third tab (Throttle Handle)
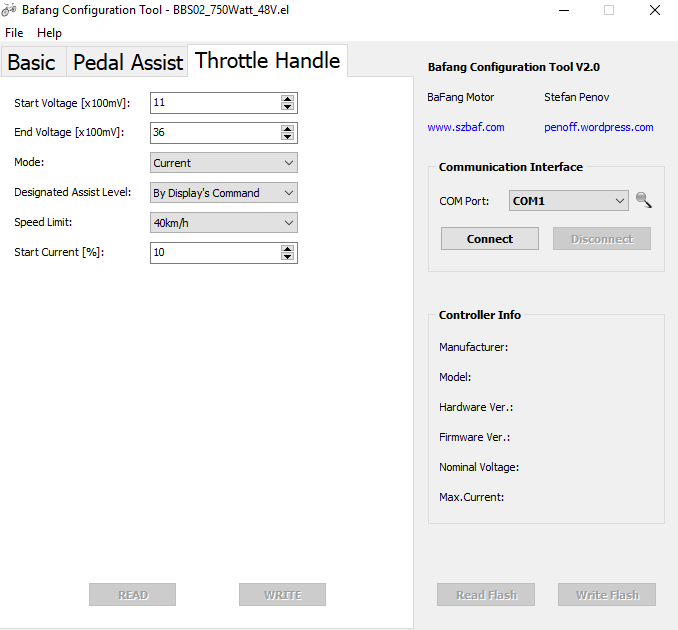
Start Voltage [x100mV]: 11
This setting will decide after how much throttle movement, the throttle will respond. Leave this setting to 11, changing it can give problems to the response of your throttle.
End Voltage [x100mV]: 36
This setting decides at which level the throttle will stop. If you want a wider range of control with your throttle you can set this to a maximum of 42. I recommend 36, since this is the default and in my opinion, works perfectly.
Mode: Current
This setting decides whether the throttle acts as a current throttle or as a speed throttle. I recommend “current” since this is easier to calculate by your controller. If your throttle responds jerky, you can try setting this to speed.
Designated Assist Level: By Display’s Command
This will decide how many levels of throttle power you will have. I recommend this setting to be the same as the amount of pedal-assist levels. Therefore leave it at ”By Display’s Command”, then it will be the same as what is set on the display’s settings. The setting on the display will set this setting and the pedal-assist setting at the same time. So they always will be equal. Take care not to hit the throttle in too high of a gear in level 9, this can burn out your controller.
Speed Limit: 40km/h
This setting doesn’t imply that the maximum speed with the throttle is 40km/u. The speed limit is overwritten by the throttle, so you will go as fast as you want. This setting works as a sort of cruise control, If you pedal and use the throttle at the same time, the motor will cut off above 40km/u. So you can maintain that speed. So set this setting to the desired ”cruise control” speed.
Start Current [%]: 10
This setting will decide how much current the motor will immediately draw when the throttle is engaged. I do not recommend settings this higher than 10, otherwise, you can wheelie of the bike because of the insane power. You also risk burning out your controller if set too high. If you have a weak drive train or IGH decrease this number even more.
If you have read this entire post, you should have a good understanding of all the settings there are. Still, you should be very careful with all the settings, always double-check before writing. If you take good care, nothing bad should happen and you can really customize everything to your liking. Good luck reprogramming your Bafang system!
If you have any questions, want to start a discussion, or need some support, please use the comment section below. I will respond to you within 24 hours.

I just put a BBS02 48V 750w on my fat bike. I believe it’s the BBS02b. The throttle only works as an on-off switch and doesn’t modulate the speed. Can this be cured?
The battery is 52V.
Hi Gerry,
The throttle isn’t that sophisticated on the Bafang motor unfortunately, but it should feel a little better than just on and off. You can try setting it from current to speed mode in the throttle tab, see what you like more. Apart from that, you can’t change anything else.
Thanks Giel for an excellent article and the links to the Configuration Tool and Drivers. I got a 750 watt BBS02B and just installed but unable to take it out yet. I wanted to reduce the power to move it in line with a 350 watt unit, so I need to reduce the current and make those changes as per your recommendations. I had a bit of an issue getting the driver to work but did get it to work by running the WIN10 driver exe once the cable was plugged in with both the motor and PC ON. It loaded up nicely and then started the Configuration Tool and made the changes. I only have done this once so far. I could not get the XP drive and my XP laptop to work but no big deal. Thanks so much for sharing. Best Regards, F
Thanks for sharing your experience, you’re welcome!
Hi Giel,
I am going to be programming my bafang 750 watt mid drive this week and would appreciate some tips. This motor is set up on my FS26 Scorpion trike. My biggest issue is that I it pedals to easy on level 1-2 at top speeds. And I very rarely will go to level 2 . I am always in my highest gear (smallest gear in the rear) .
What setting should I use to allow me to spread out the levels of assist 1-9 ? And to give me more resistance at top speeds? Thanks Dave
Hi Dave,
You should simply lower the current limit [%] to your liking for each PAS level. The lower you set it, the less assistance you will get in that level.
I have two bikes with 860C controllers. Both have developed the same problem. That is the data cleanup function has stopped working. I can no longer zero out the trip meter, etc. Otherwise, the controllers work fine.
Is there a fix short of buying new controllers?
Hi Ronald,
I think that the data cleanup function is managed by your display. Replacing the controllers therefore won’t work I think, replacing the displays then should work. It is a really strange issue though. Have you tried resetting the display settings?
Hi, just finished installing bbs02 with 48v 24.5ah battery & DPC18 display, gear sensor, hydraulic brake sensor*2 (I have mech brakes but read it doesn’t matter as far as system is concerned). I made the error of not plugging everything together before install to test it all. Completed install, charged battery for recommended 8 hours (for full charge & balance, no idea if the charger actually does this but it does talk about it in the leaflet so…lol).
So I put the battery into its cradle, power on, display boots. The light turned on and the display dimmed (the front end of the bike was in a dark room) so that works at least. I set PAS to 1, pick up the back of the bike & turn the cranks, the speed sensors light was flashing away but no power. I go through all PAS levels, same deal. I then try throttle, nothing. All the while the display didn’t show any change to speed/power output. Then I depressed the brake & released it, turning to the cranks again, I look back & the display now reads : Error code 3 High Voltage Protection.
When I press the brake the display reverts to the speedo, I release it & the error code shows. I have contacted the seller & am yet to chat with him properly though he seems keen to start troubleshooting. I tried googling the code & I can’t really find much. I stumbled across your site here and you seem like a knowledgeable person so I thought I’d post a short story about it 😀
Cheers
Hi Rob,
This is not something I heard before. Have you tried detaching the brake sensor cables, and then testing? Also did you order the right kit for your battery voltage? 48V kit for 48V battery or 36V kit for 36V battery? Sometimes controllers can just be broken and show weird error codes. So a broken controller always is a possibility.
Hi Giel
I replaced the controller and everything works fine.
It could be that the controller was OK, but ‘Stop delay’ was at 6 so could have stopped the function of PAS, as you have mentioned.
Thanks for this wonderful blog.
Greetings from Switzerland. Juerg
Hi,
Glad it works again!
Hi , i posted a comment the other day but have yet to receive a reply, so i will try again. incidentally, i dont see the comment published, so im assuming it was moderated out somehow?
Ive a BBS02 750w. My question relate to setting the Assist level 1-9 at 100% on the Speed limit. What is the advantage of this? and how will it “feel”. Some profiles have 100 all through, while others have incremental values.
Any thoughts?
Hi Jonjo,
I have approved your comment and replied!
Hi,
Im new to the bafang bbs02b 750w and just getting around to fine tuning. Your guide is very helpful. My question relates to the Speed Limit % in the various assists. ( i have chosen 0-5 in my DPC18 controller).
What is the advantage of having assist 1 through 9 set to 100% as opposed to gradual increases per assist level? how does the blanket 100% “feel” to the rider? TIA
Hi Jonjo,
I prefer to set all PAS setting to 100%, this will ensure that you will never hit a “speed wall” in any PAS level. I find it really annoying that assist turns of after I reach more than 20km/h for example. Instead, I limit the power in each PAS and increase that with each level. So you will never be limited by a software speed limit, the speed you reach will be dependent on how fast you can go using that amount of power. Which I think is a much more natural approach. If you do want these speed wall limits, you can change it though.
Thanks you , very helpful
Hi there Ive just read your guide and it sounds great. Ive just bought a bbshd 48v motor and I want to use a 52v battery. Do I need to update the motor firmware to 52v??
Many thanks ian
Hi Ian, you don’t necessarily have to update the firmware, because everything is amp based, and therefore your power will increase without changing anything. It would be good to change the low battery protection setting though. For 48V, this is 41V, for 52V, you should set it to 44V. This ensures that you can’t overdrain the battery. Apart from this, you can leave everything the same.
Hi
BBS01 with 500C display. Thanks for your software and instructions. Parallels gave the bridge for a Mac user.
Installation was easy. I did my settings for levels 1-3-5-7-9, but only level 9 worked. Then I found the post of Franco, who found that levels 2-4-6-8-9 correspond to 1-5 of the display. To be on the save side I paired 1-2, 3-4, and so on, giving equal settings to the pair, but when wanting to test the motor didn’t start at all. The display shows voltage and speed correctely.
As I have a velomobile disconnecting the battery is difficult, so I plugged the USB-cable with the motor connected to the battery. Could this have burnt the controller? How to test this out? Thanks for an idea. Juerg
Hi Juerg,
Thanks for sharing. It’s indeed best to pair 1-2, 3-4 and so on. That way it will always work like intended. I don’t think that leaving on the battery has burnt out the controller. You should check all connections and go back to your original settings. If it then still doesn’t work, I would not know how it broke, since you don’t seem to have done harmful stuff.
Hey,
does anyone know if the M400 firmware and programming tool can be used to test the operation of the motor without any connections other than the battery? Is it enough to connect pins P+ and PL (brown and yellow) together and give suitable current values to make the motor run, or does the tire speed information have to be simulated or skipped somehow?
Of course, BESST can be a solution for testing, but it will require some code from Bafang in addition to the adapter.
Thank you!
Hi Ari,
I unfortunately cannot help you with this, it’s out of my scope of knowledge. I would suggest to be carefull though, you can easily fry your controller when fiddling around with the wires. Good luck anyway!
Hi Giel, first of all, thank you for the help you give to others.
I have a question, in the first table – basic – pedal assistant , you set the speed limit everywhere to 100%, so the engine helps almost everywhere until it reaches the set speed value. Correctly? How does this affect battery consumption, since the engine constantly provides a certain amperage? (in lower PAS it is difficult to reach the speed limit if it is set at 45km / h) Thank you and I wish you all the best!
Hi Jakop,
No problem, happy to help! Your thinking is not quite correct though.
I set the speed limit to 100% everywhere, since then you will never be restricted by a speed limit. I find it really annoying that the assist suddenly cuts out at a certain speed, I don’t want this behavior. Therefore I recommend 100% since then this will not happen, making your e-bike feel much more natural.
As far as consumption, you limit this by setting the current limits instead. This way you will indeed have a constant power usage, but all this power will be used for propulsion. Nothing will go to waste in that sense. If you set speed limits, you will find that the assist cuts out, then activates again, but has to use more power to accelerate to the desired speed again. So it is not necessarily more draining for your battery. Just set the current limit to an amount you like, the lower you set it, the more range you will get.
Thank you for your reply. Makes sense. I’ll try to adjust the settings as you suggested.
I wish you all the best in the new year.
Hi Jakov,
Glad it helped! I also wish you all the best in the new year!
Yes! Set the speed and throttle to 100% I totally agree. I did this a few months ago on my DOST bike and very happy with the results.
I have yet to read anywhere a through explanation of how the PAS system works on a Bafang BBS02B motor. I’ve read in some sites, a high-level explanation, just skirting details. I guess, in order for me to understand better, i need examples. For examples, if i set the Current Limit to 20, and the Speed limit to 20 in PAS 1, then what should i expect when i turn the motor on and select PAS 1? How does that compare if I set PAS 2 to 30/30? How does speed factor in both of these settings? How does cadence factor in both of these settings? How does gear inches factor in both of these settings? It seems to me that those that are curious about this mystery, are easily accepting the vague explanation, and then walk away scratching their heads not really understanding. Please explain how the PAS system really works, or send me to someone who may have already written the complete story. Thanks,
Dan Frederick
Hi Dan,
You shouldn’t overthink the problem too much, it is quite basic after all. The current limit of 20 means, that the maximum current used in that pas, thus relating to power (Power = voltage x current), is 20% of the maximum set current limit. So for example 0.2*20 = 4A. Multiply this with your battery power and you will know the maximum power used in this pas level. For the speed limit it is the same, but now for speed. So for example 0.2*40 = 8kph maximum speed in the first PAS. The values simply define power and speed limits.
Hi,
Just used your wonderful guide to try and tune a BBS02 I’ve just installed on a disabled friend’s hand cycle. Using hand cranks instead of conventional leg pedal cranks.
I’ve turned down a lot of the settings (startup current for both pedalling and throttle, max current 16A), but I’m experiencing the bike accelerating when the cranks are being rotated slowly without applying any crank pressure. (it’s like you are using the throttle, when you are not)
I’ve installed the motor with both the gear shift cutout and ebike brake switch cutout and finding the only way to stop this “racing off” sensation is to apply the brake.
Any suggestions as to what settings I can change to stop this happening?
For info, in this configuration on a hand cycle, the cranks are also your handlebars for steering and that’s why you often rotate them without applying crank pressure to orientate them in the best position for turning ( usually fully forward or backwards, not top or bottom as you have no steering leverage.
Thanks in advance.
Jim
Hi Jim,
Unfortunately this behavior is really something you get with cadence based systems, like the BBS02. It can’t detect pressure like a torque sensing system does, it can only detect rotation. Therefore it will start accelerating when a rotation is sensed, even though no force is applied.
In your case it can help to make the cadence sensor less responsive, requiring more rotations to start accelerating. This will make your system less responsive in general, but might reduce the unwanted acceleration.
You can do this by increasing the start degree number, the higher you go, the more movement is needed for the system to start accelerating. I would just try some values and see what you like. Set it anywhere between 4 and 20.
The method of slightly applying brakes for the cut-off to kick in is a good solution though. This way you can maintain the responsiveness. It however does require more input from the rider, which might be annoying.
It’s a trade of though, less responsiveness, or more active work by doing the brake sensor hack.
Hope this helps! Good luck!
My throttle is only working when I’m not pedalling, so I can’t give extra power with the throttle when I pedal.
First I have too keep my legs still for the throttle to work, how can I solve that?
Hi Gert,
Which motor do you have?
This is an excellent guide. I have penov open source bafang programmer, a usb to bafang lead and a 500W 36V BBS02 v2.
I read about blowing the controller and worry. I set my max amps from 25A to 12A and kept most of the original settings.
I tweak it a bit at a time and it is better than the original setup. Smoother start up on level 1.
We are only allowed 250W in uk and eu so think it’s now legal as for continuous power and the throttle can be legal if bike was built before jan 2016 … which my bike was.
Thanks.
Hi Stan,
Thank you! I am glad you find a setup that works for you, enjoy!
Hai, I have a DP c18 canbus display and a Bafang 420( 43v 250 w)
Is there a way to do this?
I found besst UC 3.0 software but it is in the netherlands locked for speed limit >25
I hope you have a solution
greetz
Jos
Hi Jos,
Unfortunately I don’t have any experience with this motor. I therefore don’t know what the possibilities are. You will have to research it yourself. Good luck anyway!
Hello, Just downloaded your program, all looks to work well except when I try to change my current limit from factory 28 to 30 for my BBSHD 52v 1000w mid drive, it will not let me go past 28amp, how do I go around this?
Hi Vinnie,
There is no work around for this. I suspect you have a slightly different BBSHD controller version, with a lower current limit. Therefore you will not be able to exceed this hardware current limit. You will have to do with 28A.
Hi – I am trying to connect my BBS02 to my PC running Windows 10 with the programming cable but the device is not being properly recognized. I’ve installed the driver and a new device does show up when I plug in the cable but it just shows up as Other Devices -> USB Serial when it is supposed to be Other Devices -> CP2102 USB to UART Bridge Controller. I tried updating the driver for the USB Serial device by pointing it to the CP210x_Universal_Windows_Driver\x64 folder but it says no driver found. My version of Windows 10 is 21H1 and I found this article which appears relevant: https://community.silabs.com/s/article/Installing-VCP-v10-1-10-Silabs-driver-for-PID-0xEA63-0xEA7A-and-0xEA7B-on-Window-10-version-20H2-or-later but I can’t follow these instructions because the device is not being properly recognized. I’ve pretty much exceeded my Windows troubleshooting skills at this point. Any suggestions? Could a bad cable manifest itself this way?
Please ignore/delete my last message. I discovered that my cable does not use the CP210x driver. It is just labeled “USB to TTL” on the back. I am trying to contact the vendor who sold me the cable to see what driver I need. This should fix the issue (I hope).
Hi Robin,
These driver related issues are always really hard to solve. My experience is that some computers simply refuse to work for no reason at all. So I would definitely try to suggest another pc/laptop to see if you have better luck there.
I don’t think your driver/cable combination is causing the issue, but it is good anyway to ask the vendor. Let me know if you were able to fix it/figure out the problem.
Hi Giel – actually it was a driver/cable problem. The instructions in this article seem to imply that all programming cables use the CP210x driver. That is not the case with the cable I bought on Amazon. I ended up connecting the cable to my Linux box and running dmsg so I could see how the device was identifying itself (I don’t know how to do this on Windows). This allowed me to determined I needed the CH341 driver. Once I downloaded this driver, everything started working. So if I can make a suggestion, it might be helpful to make a note in your article that not all cables necessarily use the CP210x driver.
Hi Robin,
Really interesting, I was not aware of this. Thanks a lot for sharing! It will be updated soon.
Hi Giel
How do I change the throttle settings on my Frey CC Ultra mid drive Bafang? I purchased the programming cable direct from Frey.
Hi Taylor,
The procedure is described in this post. It should all be the same for your Bafang Ultra. So simply look at the tutorial, and change the desired setting in the throttle tab. Good luck!
Thank you for your guide.
My wife has a damaged knee and cannot pedal powerfully and cannot pedal fast.
The bafang system is based on power delivery as a function of pedaling cadence.
Question: Is there a configuration parameter that allows a high level of assistance from a low pedaling cadence??
Thanks.
Hi Javier,
You’re welcome! That’s unfortunate. To answer your question, no, not directly. I do however think that my recommended settings will provide enough assistance for low cadence, at medium speeds.
If not, I can recommend installing the throttle. This way you can always manually adjust the amount of power, independent of the pedalling cadence.
There will be a problem at high speeds though. If you can’t pedal along at higher cadence, you will basically pedalling in the air. Because you won’t be able to keep up with the motor. So the bike will definitely move forward at high speeds, but you won’t do any of the work yourself. So if you want to keep pedalling along at low cadence, you should have high gearing, and don’t go a lot quicker than 18-20mph. Above those speeds you will need to pedal quite fast to be able to pedal along. So as long as that isn’t a problem, it should be alright. The motor has lots of power to do the work for you 🙂
Hello.
is it possible that the programming cable is different for BBS01 / 02 than for BBS01B / 02B, which I have. When connecting cables, the configuration tool does not find a connection for any port.
Thanks
Hi Robi,
No the cable/interface should be the same. The issue will likely be with drivers.
Giel,
The programming you provided TRANSFORMED my ebike. It fits so much better with my riding style.
Thanks!
Scott
Hi Scott,
I am happy it helped! You’re welcome!